
So Rocket League is a phenomenally successful physics based game that is basically Car Soccer in a variety of Cars that Accelerate, Boost, Handbrake Turn, Jump, have Rocket Boost and have three dimensional Roll, Pitch and Yaw while airborne (including barrel roll). It’s a natural next step for a 777 pilot like me. Apart from the game trailer, the Honest Trailer is pretty funny to watch as well.
So it turn out that Rocket League has custom map making features which have been used to great advantage – with some pretty amazing maps. Rocket League on a Pool Table, Water Polo, Table Tennis, the game Portal, Quiddich, and more.
While you can play these maps on your own in Rocket League – Pysonix don’t support multiplayer games with custom maps (yet!). But smarter people than me have figured out how to get it to work – so I thought I would document it here as clearly and simply as I can to try and get more people to play with!
First of all = credit to Lethamyr who recorded the first video I found on this topic – you’ll find that here. Note that Rocket Launcher (the windows app) has stopped working – but the Rocket plugin for BakkesMod still works well.
The following procedure requires you to download some files from the web. I have verified these sources as genuine and installed them myself (on several PCs/Users) so I believe they are safe. All are removable.
Overview
Workshop maps are subscribed in Steam and then auto-download into Rocket League (although you may need to re-launch RL to get them). Additional textures files are copied into your Steam/RL folder so the maps look like their makers intended. Hamachi is installed to create a Virtual Private Network (VPN) on your computer that your friends can then use (Hamachi) to connect to for “Local” games”. BakkesMod is installed to permit hosting and joining local workshop maps. And that’s it!
- Subscribe to some Workshop Maps in Steam
- Download the Workshop Map Texture pack, and copy the Workshop Map texture files to your Steam Rocket League Folder. Note if you’ve never used Rocket Mods site before you’ll need to register with an email first.
- Install BakkesMod and then the Rocket Launcher Plugin for BakkesMod
- Download & Install LogMeIn Hamachi. During the install, you will need to create an account with LogMeIn and verify the account (email) before Hamachi will run properly
- With Hamachi installed and verified, you (5A) Create a network in Hamachi if you plan to host games; or (5B) Join an existing network if you’re playing on someone else’s VPN.
- You’ll need to have handy reference to the IP address of the VPN – either your own or that of the player who is hosting the game.
- Work on from [Step 7] below.
Step 1 : Subscribe to some Workshop Maps for Rocket League.
 Open Steam (or use the web interface here)
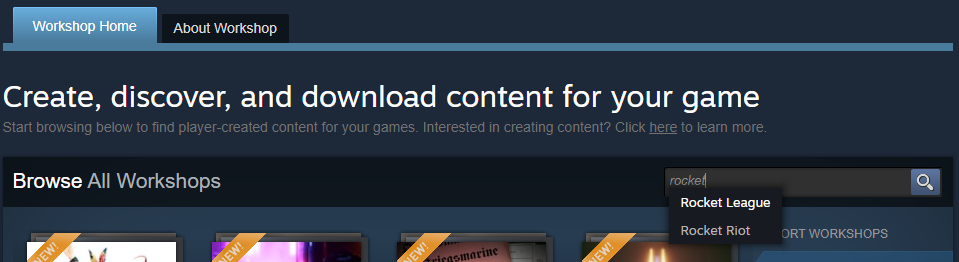
- Select COMMUNITY … WORKSHOPS
- In the Search Bar, start typing Rocket League (and the select it when it pops up)
- Star browsing for maps.
Many maps are intended for personal development, or to provide you with some entertainment while working on your basic skills – which reflects the solo nature of Workshop maps (prior to working out Private Matches!). Below is a list of maps I recommend:
- Noob Dribble (By dmc)
- Speed Jump: Rings 2 (By dmc – Skills Development)
- [2-8 Players] Beach Volley (Multiplayer)
- [2-8 Players] Beach Volley with Middle Wall (Less Cheating = Less Fun)
- Lethamyr’s Air Hockey Table (2-6 Players) (Multiplayer)
- Lethamyr’s Ping Pong Table! (Multiplayer)
- Lethamyr’s Battlegrounds v2 (Multiplayer)
- Yoshi Circuit – MKRL (Multiplayer)
- Half Pipe (Multiplayer)
- Nebula (Multiplayer)
- Wallbreaker (Dropshot on the wall!)
- Qudditch Map (it had to be done)
- Lethamyr’s 2Fort (Team Fortress 2)
- Lethamyr’s Portal (in Rocket League!)
- Canyon (Cool for the Jet Plane RL Mod)
- Ghost Hunt (from the Halloween promotion)
- Hornets Nest – By dmc (Can you get to Level 10?)
- Suggestions?
Step 2 : Download Workshop Map additional textures.
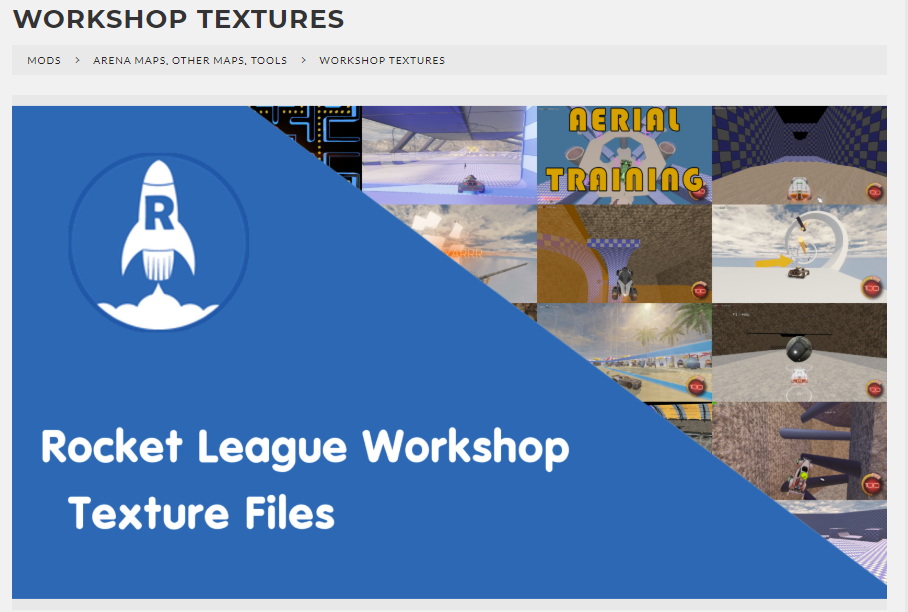 The Workshop Maps require some additional textures to really flesh out the content. These are downloaded as a ZIP file and placed into a Rocket League install folder on your computer.
- Browse to https://rocketleaguemods.com/mods/workshop-textures/ and download the ZIP file. You’ll need an account at Rocket League Mods to download the file.
- Using Windows File Explorer, open the zip file and Copy them all.
- Now browse to the Steam/Rocket League folder where they need to go – on my computer it’s located at C:\Program Files (x86)\Steam\steamapps\common\rocketleague\TAGame\CookedPCConsole – your mileage may vary …
- Paste the files into this folder. If this is the first time you’ve done this there will be no over-writing required.
Step 3 : Download BakkesMod
 Bakkes Mod is a Windows->Rocket League utility that brings with it a whole host of useful features in Rocket League. The freeplay mods are amazing for practice drills – but in this context, BakkesMod incorporates Rocket Launcher, which facilitates Hosting and Joining locally hosted custom maps.
- Download BakkesMod for Windows, and install
- BakkesMod does not require install – just unzip the download dns store the exe file where you want to run it from. Then run BakkesMod and click File … Check For Updates.
- The default BakkesMod install may not include the Rocket Launcher plugin – head across to BakkesMod plugins to get the Rocket Plugin. Use the Install with BakkesMod link button for convenient auto-install. Again – the Rocket (Launcher) Plugin does more than just Host/Join locals games – but that’s our focus for now.
- Details on Hosting/Joining below …
Step 4 : Download & Install LogMeIn’s Hamachi
Hamachi is used to create your own Virtual Private Network (VPN) into which the other Rocket League players will come into for your Private Lobby.
- Download LogMeIn’s Hamachi.
- Note the download might require a popup.
- Install Hamachi
- Run Hamachi
- Click Power On (the power button on the left near the top) to get Hamachi started. You will need a LogMeIn account to use Hamachi – create this through the app. You’ll need to verify the email address you used to create the LogMeIn account as well.
- Windows will prompt to allow network access – click to allow.
- There is a server scripting error that pops up if you have Edge installed. Click Yes to accept the error. The account will still be created but you will now have to go to your email and verify it.
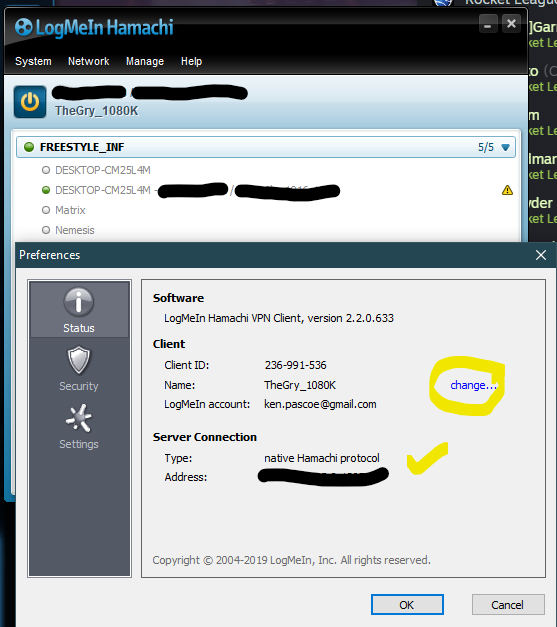
- I suggest changing the name you show as in Hamachi to make it easier for everyone. Select System … Preferences … Change
Step 5A : Create a Hamachi Network (to Host a game)
If you want to host a Rocket League private match – you do this by using Hamachi to create a local VPN for others to join. Note you only have to create the network once – after that you just turn it on and provide the details to your friends. You can create multiple networks as well – and join and keep track of multiple networks.
 Run Hamachi
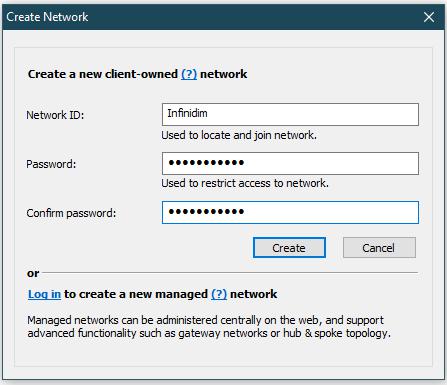
- Click Create a new network.
- Create a Network Name and Password.
- Create the network
- This network is powered on/off by Hamachi (a) running and (b) the “Power” button turned on (green).
- Note that not only will your network show in Hamachi but so will the network you are currently registered (joined) into.
Step 5B : Join a Hamachi Network
To play Rocket League multiplayer private matches – you need to join a VPN that’s hosting the game.
Note that if you can’t Create or Join a network this is usually because you haven’t verified your account with LogMeIn. In one instance a user managed to register for a paid corporate account (instead of the free one) which also stopped Hamachi from working …
 Run Hamachi
- Power it on (green button)
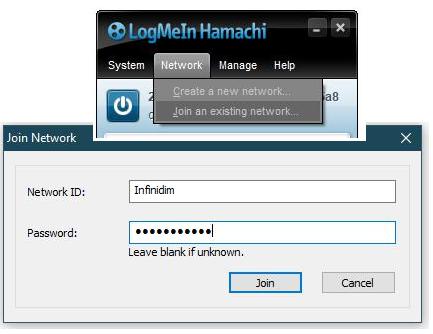
- Choose Network … Join an existing network.
- You will need the Network Name and Password from the Host
- And … you’re in.
Step 6 : IP Address Required?
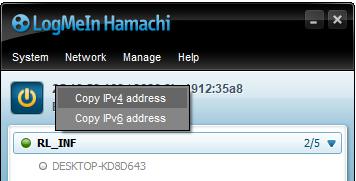 With Workshop Maps / Textures and Hamachi configured, you’re almost ready to go. When in Rocket League – you’ll need to know the IP address of the network you are going to play in. If this is your own VPN – you can get this from Hamachi. Power your network on and then right click next to the Power Button and choose Copy IPv4 address. You can paste from there into Discord/Steam (or read it out).
If you are playing on someone else’s network – ask them for their IPv4 address so you can type it into BakkesMod later.
 Step 7 : Into Rocket League / Bakkes Mod / Rocket (Launcher) Plugin
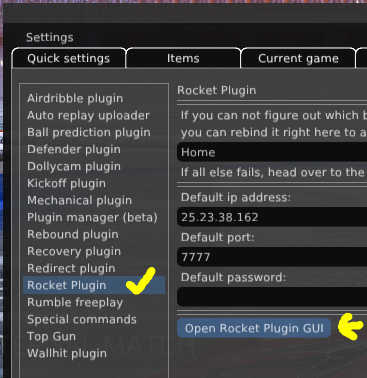
Tim to run Rocket League. At this point you should have BakkesMod and Hamachi running in Windows. With RL running, press F2 (the BakkesMod hotkey) to bring up the BakkesMod interface, and select Plugins on the far right – check you have the Rocket plugin installed.
Note you can enter the IP address into the Default ip address: prompt if you want – but this also comes later.
To access the Rocket Plugin GUI, click the Open Rocket Plugin GUI button. Note the keyboard HOME key comes pre-configured to go straight to the Rocket Plugin GUI as well.
One in the Rocket GUI – the Multiplayer Tab is divided into HOST and JOIN
 Step 8A : Host a Game
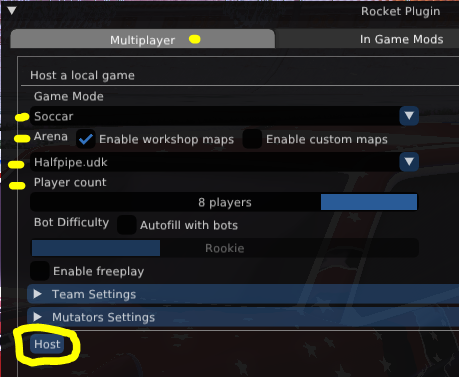
- Choose a Game Mode (Soccar, Hoops, Snowday, Rumble, Dropshot).
- Turn on Enable Workshop Maps and Choose a map. Note the list of maps is pretty clunky, showing you the Windows filename the author used (rather than the Steam Name) – so make sure you communicate this to your other players.
- Player Count ?
- Have a look through Team Settings and Mutator Settings. They’re pretty self-explanatory.
- Click Host and Rocket League will automatically commence a locally hosted match.
Step 8B : Join a Game
Joining a game is simpler.
- You need the IP address of the VPN that’s being hosted for the game. This comes from Hamachi in Step 6. Remember if you are hosting then you have to give this number to the other players.
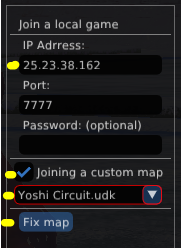 Port defaults to 7777. I have had no problems but there are notes somewhere that suggest this port needs forwarding in your router. However it seems Hamachi covers this.
- Click to Join a custom map.
- Select the Map from your list. As mentioned previously – this list is NOT user friendly and is a list of the Windows file names for the maps – get the exact name from the Hoster.
- If you have never use this map in Multiplayer – or it has changed – you will be prompted to Fix map first. This basically copies the map across so your normal RL map folder that Rocket Plugin can launch it in an online private match.
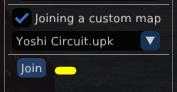 Having Fixed the map – you can the select it again and Join the game (if the VPN is established and the IP address is correct and the Host has already launched the Host game …)
Ken.
If you find my content useful and are in a position to do so – I would appreciate a contribution to my PayPal account (ken.pascoe@gmail.com) – If you use the Friends and Family feature in PayPal it reduces the charges to the transfer. Please note that when sending money in this way you are removing any form of purchase protection, which is not relevant to a contribution of this type anyway.